Seeing the world through the lens of a camera!


Thursday, June 10, 2010

Trip of a Lifetime lo with paper suading tutorial

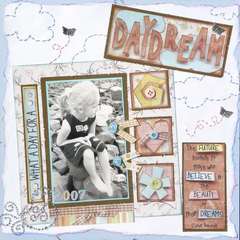
This is a lo of me and my hubby. We took a Carnival cruise to Cancun, Calica, and Cozumel. On this night, we got dressed up in our formals and dined on Lobster and Steak like royalty. It was a night I will never forget!

For the embellishments I did a paper suading technique for the photo mats. I cut up a fish net and added shells and starfish. I found some antique sailor buttons at a flea market, and I made the stick pin. Also I used Lidia's tutorial for dried roses.

For the paper suading technique you will need a paper crimper, a straight stick (i use a paint brush, and a solid core cardstock (very important) no white cores!!

To get started cut the paper down to size or you tear it to size after you are finished.


Run the paper through the paper crimper twice one way the turn it and run it through twice the other way. **You can send it through a few more times if you want, the more the better.

After it is ran through the crimper, use your straightening tool (paint brush, pencil, whatever you have laying around). Run the tool all over the paper, pinching it between your finger and the tool. This helps to seperate the core in the middle. Continue to work it all over all the way to the edge. ***When you are finished you will see the paper start to seperate at the edges.
Once the paper starts to seperate take your fingernail and seperate it enough to grap both sides of the paper. Then start pulling the paper apart slowly. If it catches and starts to tear, just stop and start at another end once you reach that spot from the other side, it will keep it from tearing. Peal the two sides completely apart.
Once you have done that, the inside of the paper will be Suaded! It will be soft to the touch, but look rough and distressed.
Then you can tear the edges (it tears very easily), ink it, punch it, layer it, ruffle it, chalk it... What ever floats your boat! Just have fun!!

Thanks for looking and I hope this tutorial helps.

Let me know if you try it, I would love to see what you do!

Also on this lo, I created this dried rose using the wonderful tutorial by the beautiful Lidia of Breaking Barriers! Thanks for the inspiration, my friend!

Thanks so much for stopping by, I absolutely love reading your comments!

Saturday, May 29, 2010

Top Secret lo
This is a lo about the relationship between my son, Will and his Grandpa Carl. They are so close and love spending time together. One of their fav things to do is to share secrets with each other. I love to see Will's eyes light up when they are playing around! I had fun with this lo and used some techniques that are a first for me.
Here are some closeups of the stitching on the side.

And the masking and rubons...


........................................................................................................................................................................
Deadly Muse lo


This is a lo of me and the girls in my bookclub, The Muse, at a booksigning with Charlaine Harris, author the Sookie Stackhouse novels. We had so much fun here. The title comes from the autograph that I recieved in my book. She wrote: "To Tabbetha, a deadly muse." I will treasure that book always.
Here are a some close ups of the techniques I used on this lo.
On the first close up, I inked some red ribbon and then twisted it up and went back and forth across the tear. I just taped it on the back no threading involved! I added some brads and pin that I made.
On the second close up, I just got the tip of my finger wet and rubbed until it formed a hole, then cut out a small piece of red paper, crinkled it up, inked it, and taped it behind the tear. I also printed some photos of the books off the internet and shrunk them to make my border.
Thank you so much for visiting my post, I always look forward to your comments.

Tuesday, May 18, 2010

Your are Going Places Award


I would love to thank the generous, lovely, caring, and sweet lady, Lidia from Breaking Barrier and beautiful, kind, and talented Lisa of the for this wonderful and unique Award. You are a very special friend and an extrememly talented blogger and scrapper. Im so happy to have made your acquaintance!


The rules of this wondeful award are:
1. Pass this award on to ten lovely ladies and great bloggers:
Cheryl, Cherrie ,Darien, Heather, Tracy (Perfect Storm), Debbie, Paula, Tricia, Mel, Tracy(Tracy Treasures)

2. Post where you wish to be in ten years!
Where I would love to be in ten years: I want to be in the same home with my sweet husband and son. My daughter, Lexy will be 20 yrs old and in pre-med, that is her dream to be a veterinarian (not mine, although when she does Im sure I wont be able to contain my pride!) I just want her to be happy. My son will be 16 and driving! OH my godness! I hope to have our family business up and running and be able to wake up every morning have a cup of coffee with Billy and ponder how we are lucky enough to be blessed with such a wonderful life.

I thank God everyday for the path he has chosen for me and my family!


Monday, May 3, 2010

Happy..Giggles and Smiles

This is a lo of my baby boy, Will, when he was about four months old. He will be 6 years old in July. How time flies!!
This is one of the los that I started at my crop on NSD.
I had lots of inspiration on this one! I tore around the edges and inked them to looked burned, I also painted a lite blue around the photo and added a rubon to the corner.

The rope is braided ribbon twisted with fiber. Thanks Wendy for the tut! The roses are Prima! The first time that I have used Prima! And my dear friend, Anna showed me how to do the misting technique on cream colored paper. She also gave me the embossed yellow paper.

I made the ribbon flower using Lisa's tutorial, the middle is a keychain that my dd bought me!

I made the stick pen to match, and added some pearls to the fan punch. I really enjoyed doing this lo. Hope you enjoying looking at it!
Thanks ladies for all the wonderful ideas!
The links to these wondeful tutorials are in my list.


Thanks so much for your comments, they really do mean alot to me!

Tuesday, April 27, 2010

Sunshine Award

Hey Ladies! I want to THANK the Beautiful and so very Talented Darien for passing the Sunshine Award to me!! Thank you so much Darien, you are such a good friend!!


These are the rules of the Sunshine Award:

1. Put the Sunshine Award on your blog and/or within your post.

2.Pass the award to 12 other Bloggers.

3.Link the nominees within your post.

4. Let them know they recieved this award by leaving a comment on their blog.

5. Share the love and link to the person from whom you recieved the award.

Here are the 12 lovely ladies that I would like to pass the to : Lidia (thank you so much for all your help on my blog!) , Melinda, Lisa(I can't find your blog), Amanda Sevall, Sarah, Melissa, Vicky, Thanks to you nine ladies for being my first followers! I would also like to pass the award to , Wendy (thanks for inspiring me to start a blog). Heather, Luzma, Heidi. Im also giving it back to Darien, because she is just Awesome and deserves it. Darien, you dont have to send it back to 12. I just wanted you to know how much I appreciate you!


You ladies are also so great!

Saturday, April 17, 2010

Bloom! with ribbon rose tutorial

Description: My dd on Easter day! Stopping to smell the flowers!

I made the ribbon roses and the beaded yellow flowers on the fence. I struggled with them stems of the flower and finally decided not to do stems. I hand cut the sun and added buttons. I did lots of doodling to bring it all together.

Keep reading for a tutorial on the ribbon roses. Bear with me though, this is my first one!
Thanks so much for looking.
This is a close up of the ribbon rose we will be making.
It is very simple and I will try to explain it well. The pictures that I have taken hopefully will help out quite a bit.
The supplies that you need are:***35 in of a two sided ribbon (silk ribbons work best because they are less stiff. ***1 piece of embroidery floss or any strong thread. It needs to be close to the same color as the ribbon.***A craft needle with a large enough eye to thread the ribbon through.***scotch tape *** eyelet punch (i use 1/8in for center and 1/16 for outer holes.


You begin by drawing a circle on the back of a piece of cardstock. I use green so that when you cut it off it will look like leaves. The circle will be approx. 1 1/2 in across. I use a lid to trace. Punch a hole in the middle of the circle with the 1/8in punch; then punch 5 holes around the outline of the circle with the 1/16 in punch. Holes have to be small so they are'nt seen at the end..

After the holes are punched sew a five pointed star with the floss. Make sure the star is on the front of the paper and you can't see the circle that you drew. (the circle was only to keep even spacing from the center.) Tape the ends of floss on the back.
Don't tie knots, this will keep it from being bulky on the back when it is finished. Thread the ribbon in a large eyed needle. Dont tie the ribbon at the end; just pull it through about 1/2 inch. If you tie it, it will be hard to get the knot through the hole!
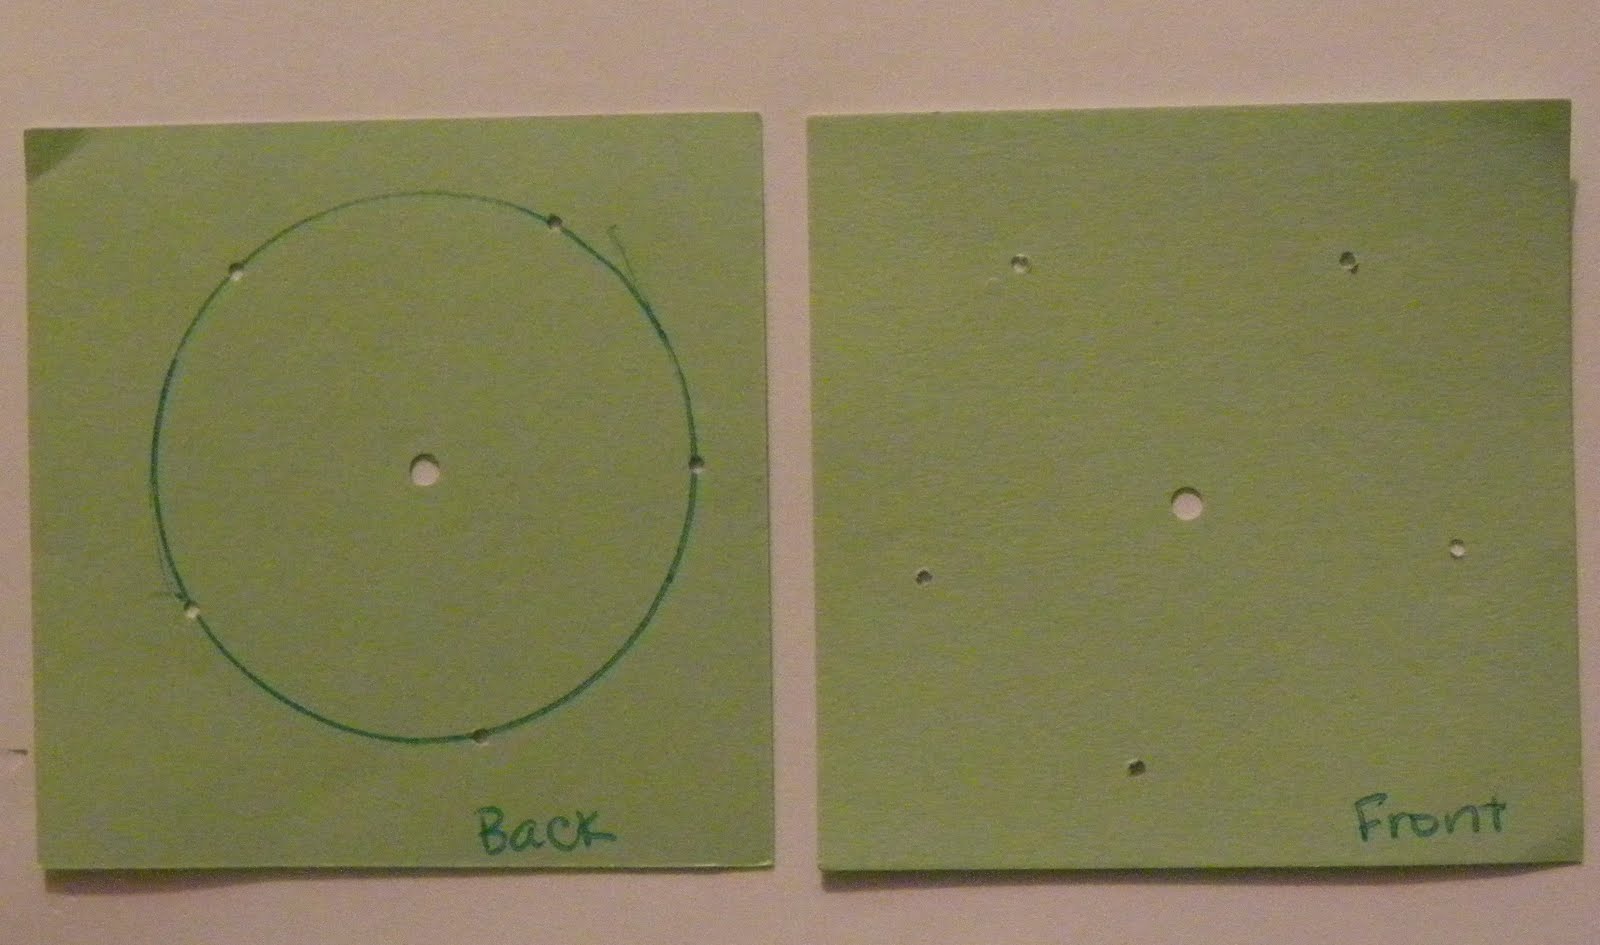
Bring the ribbon up through the center hole in the circle, careful not to catch the floss in your needle.
Again tape the ribbon in the back. Don't tie it, due to bulk!!


Thread the ribbon over the first arm of the star and under the next arm.
It does matter where you start.
Continue threading the ribbon over and under every arm, starting in the center and working you way all the way out to the edge.
Note: Let the ribbon curl up, don't try to keep it straight. This is what gives it the rose petal effect.
Note: Dont pull the ribbon too tight, it needs to be a little loose to have the fullness of a rose.


Once you have weaved it over and under all the way to the edge, and the holes are covered, pierce the needle through the paper. Go up under the rose to hide the end. Pull the ribbon all the way through to the back. (you have to pull firm and work it through the paper. The paper will probably tear a little, thats ok. It will be hidden.) Tape it off and you are almost done.
Now you can trim it off the paper. You can cut it around the rose with scalloped scissors or cut it off where you can only see little tips of paper at each point of the star. ***Careful not to snip the treads at the points of the star!!
You can also sew this directly on to your layout, if you are brave :). I have done it once, but I like being able to move them around if I want. Secure with a few small glue dots!
VIOLA!! You are FINISHED!! CONGRATS on making a beautiful ribbon rose!
Hope this was easy to understand. It really is easy to do once you get the hang of it. If you have any questions, please let me know. I would love to hear from you! Tab

Wednesday, April 14, 2010

Tabbilwilex's Gallery: What a day for a daydream

Tabbilwilex's Gallery: What a day for a daydream

This is a another lo of my dd. I stiched the clouds and butterfly trails with embroidery floss. I litely drew them out in pencil first then erased them after I stitched it in. I also tore and inked the edges of the white background to soften it up. Thanks so much for looking.

Tuesday, April 13, 2010

First Post

Hello Everyone! Thanks for visiting my blog! This is where I will display my scrapping ideas and tutorial for the embellishments I make! Im so NOT computer savy, so hang in there with me, I assure you it will get better!!